Tiles

Limestone Tiles Sealed With Brown Wood Sealer after restoration in Tewksbury

Restoring Limestone Tiles Sealed With Brown Wood Sealer in Tewksbury

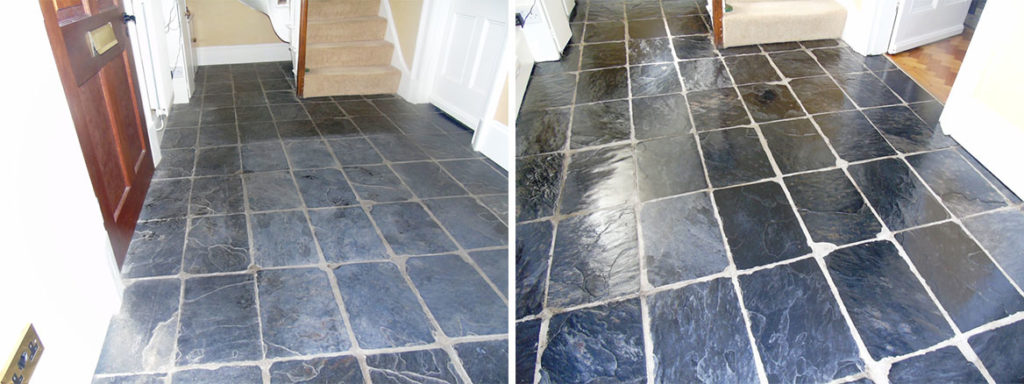
Slightly different story for you below; this time from the medieval town of Tewksbury which dates all the way back to the 8th century. A customer there had asked if there was anything that could be done to restore the appearance of their polished Limestone kitchen floor on which he had previously applied a wood sealer which had turned the tiles brown.

I inspected the floor and ran a test clean on a small section of tile which successfully removed the wood seal. This gave the customer the confidence to book me into to complete the job which I estimated would take three days to strip off the old sealer, deep clean and reseal with a more appropriate product.

Limestone Tiles Sealed With Brown Wood Sealer before restoration in Tewksbury
You probably can’t appreciate how bad the tiles looked from the photograph above but if you look at the indicated area under the kitchen units where the kick boards have been removed you can really see how the brown stain in the wood sealer has darkened the look of the tile.

Removing Old Sealers from Limestone Kitchen Floor

On the first day I prepared the area by removing the kick boards from the underneath the kitchen units so they wouldn’t get affected by the cleaning process and started wetting the floor with water. The water lubricates the burnishing process whereby coarse diamond encrusted pads are applied to the floor with a buffing machine. We started the process using a very coarse 100 grit milling pad to remove the wood sealer before moving onto the finer pads from 200 grit, 400 grit, 800 grit and finally 1500 grit pad building the finish of the floor as we progressed. The floor is rinsed with water between pads and the slurry is removed using a wet vacuum.

This burnishing process took up all of the first day so the next day I returned to focus on the edges I had missed and the grout lines, being a relatively small format tile for Limestone there was a lot of grout to cover. I tacked the grout lines with Remove and Go which is a powerful stripper and cleaning agent which is applied along the grout line and then scrubbed in with a narrow stiff brush before being rinsed away with water. The edges were treated with a set of small six inch milling pads fitted to a hand held buffing machine in a similar process as on the first day.

Sealing a Limestone Tiled Floor

On the third and final day the floor was spray burnished which a process is involving a very fine 3,000 grit floor burnishing pad and a little water spayed onto the floor during the application. This process really tightens up the pores in the stone and restores its appearance.

After making sure the floor was free of any lose grit I then proceeded to seal the Limestone with Tile Doctor Ultra Seal which is a natural look sealer that doesn’t alter the appearance of the stone but penetrates into the pores of the stone to protect it from within. I left it to dry for an hour then buffed the floor with a white buffing pad before apply a second coat. This was also left to dry for an hour before running the buffing pad over for a last time.

Limestone Tiles Sealed With Brown Wood Sealer After restoration in Tewksbury
It took a fair amount of work to get the floor looking back the way it was meant to be but I’m very pleased with the outcome and more importantly my customer was really happy.

Limestone Tiles Sealed With Brown Wood Sealer After restoration in Tewksbury
 

Professional Limestone Floor Polishing and Sealing in Gloucestershire

Restoring Limestone Tiles Sealed With Brown Wood Sealer in Tewksbury Read More »

Slate tiled hallway floor Before After Cleaning Gloucester

Badly Maintained Slate Tiles Rejuvenated in Gloucester

This Slate tiled floor in the hallway of a property in Gloucester had been laid 28 years ago, but during this time had received no proper maintenance. The property owner used to clean the tiles once a week using a steam cleaner to little effect.

Slate tiled hallway floor Before Cleaning Gloucester
In fact, we don’t normally recommend steam cleaning sealed surfaces as it will erode the sealer prematurely. After countless years of steam cleaning, I was confident that any traces of old sealer on this floor would be non-existent at this point.

This is, of course, a problem because a lack of sealer exposes the stone to ingrained dirt and stains. The effects of this are shown in the photos below: as you can see, the Slate had completely lost its lustre and naturally colourful patina.

Slate tiled hallway floor Before Cleaning Gloucester
I was asked by the property owner to provide this Slate tiled hallway with the restoration that was so long overdue, so I travelled to the house in Gloucester, a city situated near the Welsh border and between the Cotswolds and the Forest of Dean.

Cleaning a Dirty Slate Tiled Hallway

I started the restoration by mixing a strong solution of Tile Doctor Remove and Go combined with Tile Doctor NanoTech HBU. These two products serve different purposes. Remove and Go is a stripper designed to break down any traces of old sealer that might still have existed, as well as any paints and adhesive markings; NanoTech HBU is a potent cleaner which contains nano-sized cleaning particles that penetrate deep into the stone to get underneath tough dirt and stains to dissolve and lift them out.

This cleaning solution was spread over the floor and left to dwell for 30 minutes, before being scrubbed in using a black scrubbing pad fitted to a buffing machine. A thick black slurry resulted from this process and this needed to be removed using a wet vacuum.

Slate tiled hallway floor During Cleaning Gloucester
Next, I repeated this cleaning process using Tile Doctor Pro Clean, our reliable alkaline cleaner, to provide a more thorough clean for the tiles and grout. The slurry was once again removed using a wet vacuum, before I then rinsed the whole floor with fresh water to remove any traces of chemicals.

When satisfied with outcome of the cleaning process, I left the floor to dry overnight.

Sealing a Slate Tiled Hallway

Upon arriving back at the property, the next day, I ran some quick moisture tests to check that the floor was dry. Thankfully, there were no damp issues and I was able to seal the tiles using four coats of Tile Doctor Seal and Go, leaving each coat to dry before applying the next.

Seal and Go is a water based sealer (so no smell as it dries) which adds durable stain resistance and a low-sheen finish that brings out the best in the slate.

Slate tiled hallway floor After Cleaning Gloucester
The customer’s reaction to the outcome of the restoration was fantastic. She never expected the floor to turn out so beautifully and was very pleased.

Slate tiled hallway floor After Cleaning Gloucester
 

Professional Restoration of an Unmaintained Slate Tiled Hallway in Gloucestershire

Badly Maintained Slate Tiles Rejuvenated in Gloucester Read More »

Limestone-Bathroom-Floor-After-Polishing-Cirencester

Restoring the Appearance of a Polished Limestone Tiled Floor in Cirencester

This customer was looking to rent out his property in the East Gloucestershire town of Cirencester, the largest in the Cotswold District. However, he found that many prospective tenants were put off by the condition of the Limestone floor tiles on the ground floor.

Limestone Bathroom Floor Before Cleaning Cirencester
Over the years, the sealer had worn away and that had allowed for dirt and stains to become ingrained in the pores of the stone, leaving the Limestone tiles looking very dull, unclean and generally undesirable. To boost his chance of finding a tenant for the property, the customer asked me to come in to restore the Limestone tiles to their best possible condition.

Limestone Kitchen Floor Before Cleaning Cirencester
I arrived at the property and conducted a survey to assess the situation. The customer – not wanting to waste any more time – asked if I could complete the restoration straight away, fortunately I was able to shuffle a few things around and was able to make a start two days later.

Limestone Floor Before Cleaning Cirencester

Burnishing a Dull and Dirty Limestone Tiled Floor

With Limestone, as well as other high-end stone like Marble and Travertine, we find that the best method for restoration is burnishing. This is a form of polishing which involves the sequential application of diamond encrusted pads of different grit levels.

We work with a system of four pads fitted to a buffing machine. The first is a Coarse pad, which grinds away the top layer of dirt and staining from the stone, along with any old sealer. I then moved through the system, applying each in turn the Medium, Fine, and Very Fine burnishing pads to gradually refine the polish on the floor. A small amount of water was used as lubricant between each pad, and I hoovered up any resulting slurry with a wet-vac machine.

Having finished polishing the stone, I paid attention to cleaning the grout lines, applying Tile Doctor Remove and Go, which draws out any ingrained stains and heavy grease build-up, and scrubbing it in with a specialised grout brush. The floor was then left to dry out completely overnight.

Sealing a Limestone Tiled Floor

Upon returning to the property the next day, I checked the floor was completely dry and quickly vacuumed up any leftover debris from the previous day’s work. Next, I gave the floor another polish with the Very Fine 3000 grit diamond burnishing pad, vacuumed it again, and it was then ready to be sealed.

Limestone Floor Sealing Cirencester
To do this I used Tile Doctor Colour Grow, which is an impregnating sealer that not only acts to protect the stone, but also intensify its natural colours. The floor was then left to dry for an hour, before I subsequently gave it one final dry polish using the Very Fine burnishing pa fitted to the buffing machine. After vacuuming up any debris, I applied a second coat of Colour Grow, left it to dry, and finally buffed it with a soft white pad.

Limestone Kitchen Floor After Polishing Cirencester
The customer was really pleased with the results, having never expected for the restoration to turn out so well. Undoubtedly there will a queue of prospective tenants hoping to see the property now that the Limestone tiled floor looks so great!

Limestone Bathroom Floor After Polishing Cirencester
 

Professional Tile Burnishing, Cleaning and Sealing for a Dirty and Stained Limestone Tiled Floor Restoration in Cirencester

Restoring the Appearance of a Polished Limestone Tiled Floor in Cirencester Read More »

Old Quarry Tiled Church Steps Before After Cleaning Tewkesbury

Quarry Tiles From the 1850s Rejuvenated at a Church in Tewkesbury

Tewkesbury, the town and civil parish in Gloucestershire, is famous for the Tewkesbury Abbey, a Norman abbey church dating back to the 7th century so it has a lot of history and some very old buildings. Although not one of the oldest buildings in the town I was recently called to a small church in Tewksbury to restore the Quarry tiled entrance way dating back to the 1850s. The tiles had become very heavily ingrained with pigeon droppings, paint, cement, and general dirt over the years – and they were well past due for some professional attention.

Old Quarry Tiled Church Steps Before Cleaning Tewkesbury

Deep Cleaning Dirty Quarry Tiled Steps

My first job was to scrape away all the excess pigeon droppings and paint that could be removed by hand. Once the floor was clear, I was able to cover it with a strong solution of two of our cleaning products: Tile Doctor Remove and Go and Tile Doctor NanoTech HBU. While the cleaners are similarly powerful, they serve slightly different purposes.

Remove and Go is specially designed to strip away any old sealers, synthetic finishes, adhesives, cements, and paints. It also helps to draw old ingrained stains and remove heavy grease build-up. NanoTech HBU on the other hand is a penetrating cleaner designed to work where other cleaners won’t. It does this by utilizing nano-sized particles to reach underneath tough stains, dissolve them, and lift them out. Both products are suitable for use on polished and unpolished natural stone, including Limestone, Marble, Slate, Travertine and, of course, Quarry.

The cleaning solution was left to dwell for 45 minutes and then scrubbed into the tiles using a black pad fitted to a buffing machine. I then repeated this process with the same products to clean the grout lines. When I was happy with the overall cleanliness of the tiles, I spot cleaned some particularly stubborn stains using a steam cleaner in combination with a handheld scraper and some more NanoTech HBU.

Old Quarry Tiled Church Steps During Cleaning Tewkesbury

Sealing a Quarry Tiled Entrance Way

After finishing the cleaning process, I left the tiles to dry for two days. The tiles needed a good amount of time to dry completely because the old tiles don’t have the reasonably modern benefit of a damp-proof membrane.

Upon my return to the church I checked for any damp issues, and when satisfied that there weren’t any to deal with, I proceeded to seal the tiles using four coats of Tile Doctor Colour Grow. This is an impregnating sealer that enhances the natural colours in the Quarry tiles and provides the natural look, matte finish that the proprietor of the church had requested.

As you can see from the photo below, the result of the restoration was transformational. Needless to say, the parishioners will be very happy with the rejuvenated entrance way and, thanks to a highly durable sealant, the steps will be protected for the long term.

Old Quarry Tiled Church Steps During Cleaning Tewkesbury
 

Church Step Restoration in Gloucestershire

Quarry Tiles From the 1850s Rejuvenated at a Church in Tewkesbury Read More »

Scroll to Top