Floor Tiles

Edwardian Tiled Hallway Floor Restoration Dursley

Edwardian Hallway Floor Tile Restoration in Dursley

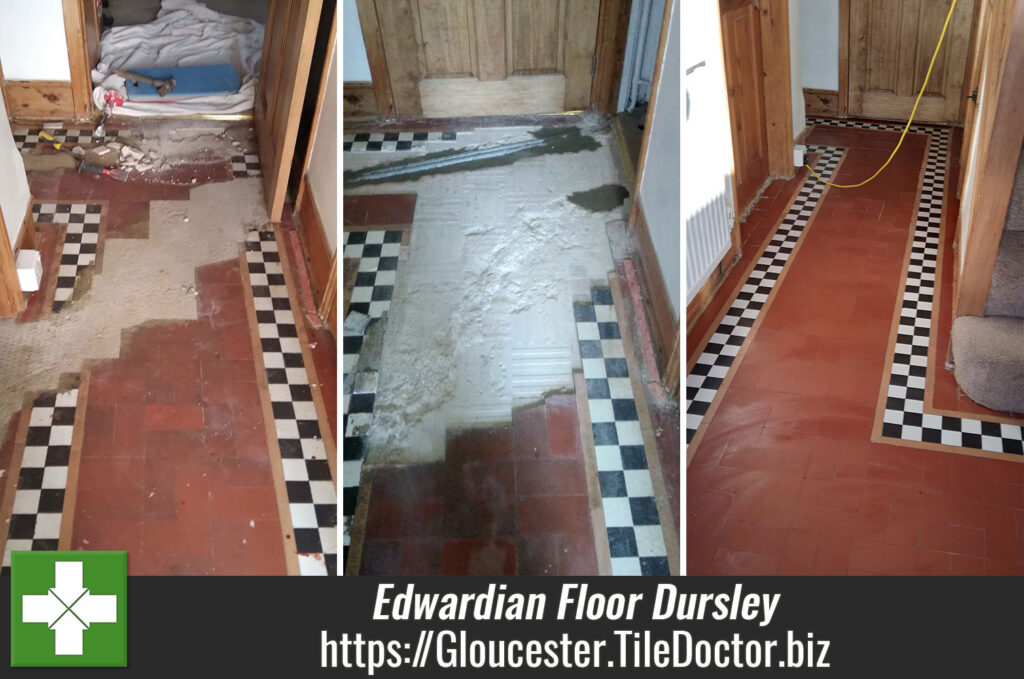
This client from Dursley got in touch regarding their hallway floor tiling which had been badly damaged in two sections during the installation of heating pipework. With the tile and base chopped out the pipes has been laid and backfilled with concrete up to the level of the original floor so it could be covered with laminate. The property was Edwardian and now unhappy with the laminate wanted the floor restored to its original state.

Edwardian Tiled Hallway Floor Before Restoration Dursley

I’m based in Dursley so it wasn’t long before I was able to head over to the property and recommend a way forward. Having inspected the problems first hand I was able to create an accurate quote that would involve removing the backfilled concrete, bringing up the base to the right level and then replacing the missing tiles with matching. The whole floor could then be deep cleaned and sealed to ensure the new tiles matched perfectly with the existing. My quote was accepted, and a date agreed for the work to commence which would take four days.

Cleaning and Repairing an Edwardian Tiled Hallway Floor

Before starting the work, I had managed to source replacements, sizing can be a problem with these older imperial sized tiles however they are usually not too difficult to find.

The first day started with the removal of concrete from the damaged area, this proved difficult as there were water pipes just under the surface and naturally, I didn’t want to disturb these. So with just the use of hand tools I moved slowly and carefully to remove the concrete. Before leaving I brought up the level of the exposed subfloor using self-levelling cement which covered the exposed pipework and formed a level flat base on which I could fix the replacement tiles

Day two was spent tiling, followed by grouting. It wasn’t a large area but there were some intricate cuts to manage and a black and white chequered border to replace. Needless to say, this took up most of the day.

Edwardian Tiled Hallway Floor During Restoration Dursley Edwardian Tiled Hallway Floor During Restoration Dursley

I left the floor to settle a couple of days then returned to deep clean the hallway using Tile Doctor Acid Gel worked in with a 200-grit pad fitted to a buffing machine. This was then rinsed off with minimal water and extracted with a wet vacuum. The floor was inspected and any stubborn areas re-treated. After a quick final rinse and extract the floor was left to dry off fully.

You do have to be careful with these old floors which don’t have a damp proof membrane though as using too much water can take a long time to dry out, hence the use of a gel cleaning product and minimal water.

Sealing an Edwardian Tiled Hallway Floor

Once cleaned I left the floor to dry out for 2 days before returning. I know from experience its not a good idea to apply sealer to a damp floor as the results can be patchy so its always a good idea to allow plenty of time for this.

To seal the floor, I used multiple coats of Tile Doctor Seal and Go Extra which has a modern acrylic formula that will allow the floor to breathe and ensure any moisture can pass through the tile and evaporate at the surface. The sealer will protect the tiles from dirt becoming ingrained in its pores and enhance their appearance; the new sealer also makes it easier for the new and old tiles to blend better.

Edwardian Tiled Hallway Floor After Restoration Dursley Edwardian Tiled Hallway Floor After Restoration Dursley

My client was very pleased with the transformation and so happy that the floor had been restored to its original condition. Before leaving I took time to discuss aftercare and for this floor I recommended the use of Tile Doctor Neutral Tile Cleaner, it’s a mild but effective cleaner that is ideal for maintaining sealed tiles.


Professional Restoration of an Edwardian Tiled Hallway in Gloucestershire

Edwardian Hallway Floor Tile Restoration in Dursley Read More »

Terracotta Flooring Before After Renovation Dursley

Removing Wax from 30-Year-Old Terracotta Flooring in Dursley

Our client contacted us to find out if anything could be done about his Terracotta tiled floor which has been laid thirty years prior in the Conservatory and Kitchen of his house in Dursley. I went over to survey the floors and conduct a test clean on part of the floor to see what would be needed to renovate it. Fortunately, the customer knew the maintenance history of the floor and had told me for the last thirty years they had been applying wax which can be tricky to remove.

Terracotta Conservatory Floor Dursley Before Cleaning Terracotta Conservatory Floor Dursley Before Cleaning

The test clean went well and he was amazed how clean I managed to get the tile so confident in a good result a date was booked in for us to return to do the whole floor. We find surveying the floor before pricing is the most accurate way to provide a quotation as there are no surprises for all concerned.

Cleaning a Terracotta Tiled Conservatory Floor

On arrival the first task was to cover all the skirting boards, walls, and units to protect them. The floor was really dirty, and I could see we would need to conduct a lot of rinsing with water to remove the soiling. Having been informed about the wax covering from my earlier visit I was able to start stripping off the old layers of wax using a Tile Doctor product called Wax-Away which is made for this type of work. The product was mopped onto the floor, left to soak in for ten minutes and then scrubbed in with a black burnishing pad fitted to a rotary floor buffing machine. The soil was then rinsed away with water and extracted with a wet vacuum.

This process was repeated until I was happy the wax had been removed and then I turned my attention to the grout which was really ingrained with dirt. For this I sprayed on Tile Doctor Remove and Go, left it to dwell for ten minutes as before and then set about scrubbing it clean. Once this was complete and I was happy with the results the floor was washed with fresh water twice to remove any trace of product and the floor dried with the wet vacuum.

The floor was then covered with dust sheets so the customer could carry on using the floor as normal whilst we left it to dry out for three days. Terracotta is very porous and needs to be bone dry before sealing to achieve the best result.

Sealing a Terracotta Tiled Conservatory and Kitchen Floor

On our return 3 days later, I did a moisture test to ensure the floor was dry. The results were good, so I set about sealing the Terracotta with Tile Doctor Seal and Go which was the best sealer for this type of floor. I applied seven coats which takes some time as you need to ensure each coat has dried before applying the next. This sealer leaves a nice sheen but also allows the Orangey/Red colour in the Terracotta to come through.

Terracotta Conservatory Floor Dursley During Sealing Terracotta Kitchen Floor Dursley During Sealing

Once complete it was clear the deep clean and fresh seal had given the rooms a new lease of life and my client could not believe how well it had come up. For aftercare I recommend the use of Tile Doctor Neutral Tile Cleaner which is designed for the day to day cleaning of sealed tiles.

Terracotta Conservatory Floor Dursley After Sealing Terracotta Conservatory Floor Dursley After Sealing


Professional Renovation of a Terracotta Tiled Conservatory and Kitchen Floor in Gloucestershire

Removing Wax from 30-Year-Old Terracotta Flooring in Dursley Read More »

Victorian Tiled Hallway Floor Before and After Restoration Nailsworth

Restoring a Victorian Tiled Hallway in Nailsworth

This Victorian tiled hallway floor at a property in Nailsworth needed repairs to four areas and then required a deep clean and seal. The client was unsure if this was something, we would be able to help with but after speaking to him on the phone and review the photographs he sent over I reassured him it should be possible.

Victorian Tiled Hallway Floor Before Renovation Nailsworth Victorian Tiled Hallway Floor Before Renovation Nailsworth

The owner was keen to progress to I arranged an appointment to visit the property and survey the floor to get a better idea of the issues and provide a price for fully restoring the floor to the best condition possible. As the pictures show the Victorian tiles looked dull and washed out, there were also white paint spots on the tiles. I was confident the floor could be saved, and the owner was happy with my quote, so we scheduled a date for the work to start.

Repairing and Cleaning and a Victorian Tiled Hallway Floor

I spent the first day repairing the floor which in most cases requires carefully lifting the old tiles, scraping out the adhesive and cement and then re-fixing the original tile or a replacement back in place. We are usually able to source replacement tiles, either reclaimed or reproduction and we had managed to find some to match this floor. It’s a slow process and with four areas of Victorian flooring in need of attention so this step took up much of the first day. The floor was left to dry overnight so the adhesive would set.

On the second day I deep cleaned the tiles with a 200-grit diamond pad fitted to a rotary buffer using water to lubricate. The resultant slurry was then extracted with a wet vacuum and the process was repeated with a 400-grit burnishing pad. All the edges were done with water and small handheld diamond blocks as the rotary machine was too large to reach the corners and edges.

To finish the cleaning I treated the tiles to an acid wash using Tile Doctor Grout Clean Up which as well as removing any old grout smears would neutralise any efflorescent salts contained within the floor which can be problem on old floors like this that don’t have a damp proof membrane installed. Another advantage of doing this is that you achieve a stronger bond between the sealer and the tile.

Sealing a Victorian Tiled Hallway Floor

The floor was left to dry for 3 days after which I returned to seal it. Before starting thought I took some moisture readings with the damp meter. Once I was satisfied, I started applying the first of what would be five coats of sealer and for this floor I chose Tile Doctor Seal and Go Extra. There were several reasons for choice including the satin finish however my main thought was the age of the floor which meant it would not have a damp-proof membrane installed so any moisture would need to rise through the tile without being impeded, Seal and Go extra allows for this.

Victorian Tiled Hallway Floor After Repair Nailsworth Victorian Tiled Hallway Floor After Repair Nailsworth

My customer was really pleased with the result and happy to have the floor restored back to its original state.

Victorian Tiled Hallway Floor After Renovation Nailsworth


Professional Restoration of a Victorian Tiled Hallway in the Cotswolds

Restoring a Victorian Tiled Hallway in Nailsworth Read More »

Scroll to Top