kitchen

Quarry Tiled Kitchen Floor Before and After Restoration in Cheltenham

Poorly Maintained Kitchen Quarry Tiles Rejuvenated in Cheltenham

It’s often quite surprising what condition we find some tiles in when were asked to come out and survey the floor. Case in point being this Quarry tiled kitchen floor I was asked to look at by a customer in Cheltenham, which as you may know is particularly famous for its racecourse and the top-secret GCHQ.

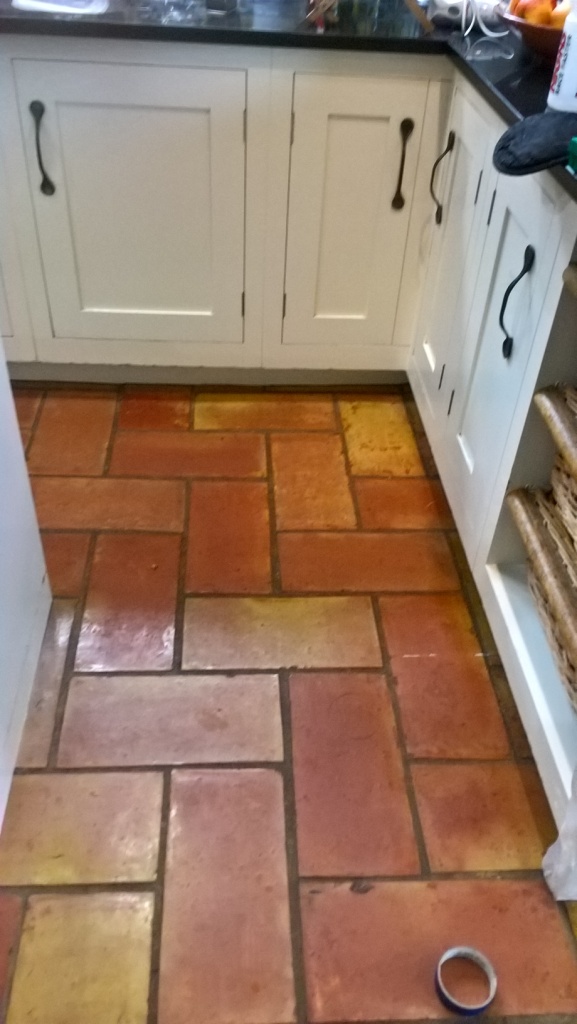
Upon arrival at the property, I found that the floor was not in great condition. For some reason, it had been painted over with red tile paint and then covered with a wax coating which was easily scratched. To Make the situation worse, there were around 20 tiles in the floor with holes in them that had simply been filled with concrete.

Quarry Tiled Floor Cheltenham Before Removing Paint Quarry Tiled Floor Cheltenham Before Removing Paint

Clearly, the tiles had not been maintained properly in the past but fortunately the current owner of the property who was keen to have them restored had called in Tile Doctor and after a demonstration clean I was booked to come back and correct the numerous issues.

Cleaning a Damaged Quarry Tiled Kitchen Floor

On the first day of the restoration, I started by applying a solution of Tile Doctor Remove and Go across the entire floor and leaving the product to dwell for around 30 minutes. Remove and Go is a powerful stripper designed to loosen paint splashes, adhesive stains and many types of urethane and wax coatings so that they can be easily removed.

After leaving the product to dwell, I could use a handheld scrapper to simply remove the wax coating and layer of paint on the floor. This process took about half a day; during the second half of the day, I spent my time removing the damaged tiles and replacing them with new Quarry tiles that had been sourced to match nicely with the existing floor.

Quarry Tiled Floor Cheltenham During
On the second day, any stubborn paint splashes remaining were re-treated and I subsequently deep cleaned the floor using a strong dilution of Tile Doctor Pro-Clean. This strong alkaline cleaning product was worked into the tiles using a 17-inch scrubbing pad fitted to a specialised rotary machine. The resultant soil was extracted off the floor using a wet vacuum and given a rinse with water to neutralise the floor. The wet vacuum was used again to remove the water and extract as much moisture from the tiles as possible to improve the drying time.

Sealing a Quarry Tiled Kitchen Floor

Once the deep clean had been completed, I left the floor dry for two days to allow sufficient time for it to dry thoroughly. Upon returning to the property, I ran a damp test to see if the tiles were dry enough to be sealed. To my surprise, the floor recorded only around 4% moisture even though the property is relatively old and is unlikely to have a damp proof membrane installed.

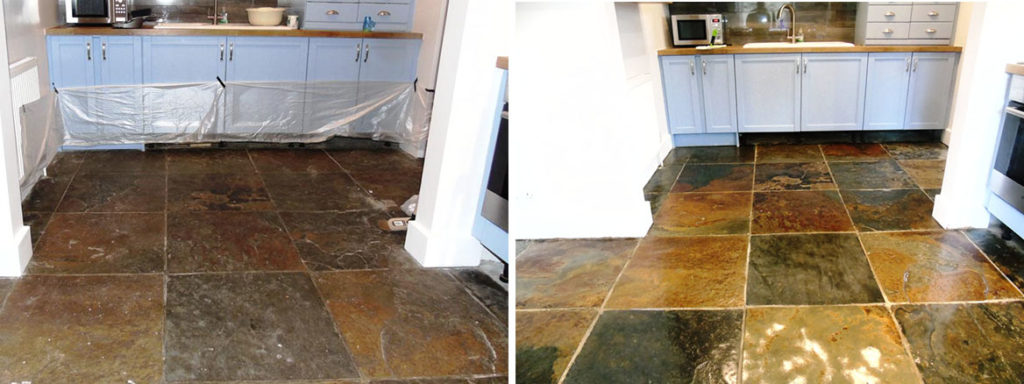
Nonetheless, this meant I could seal the floor. I did this by using a single coat of our impregnating, colour-intensifying sealer known as Tile Doctor Colour Grow, followed by three coats of Tile Doctor Seal and Go, a water based sealer which provides a high-quality satin finish.

Quarry Tiled Floor Cheltenham After Cleaning and Sealing Quarry Tiled Floor Cheltenham After Cleaning and Sealing

The deep clean, combined with the application of two different sealers, really helped to give these Quarry tiles a new lease of life. The customer was very happy indeed – in fact, had this been an exam, I’m certain I would’ve received top marks and it was certainly a major improvement on how they were before.

Professional Restoration of a Quarry Tiled Kitchen Floor in Gloucestershire

Poorly Maintained Kitchen Quarry Tiles Rejuvenated in Cheltenham Read More »

Terracotta Kitchen Floor Tiles in Bristol Before After Cleaning and Sealing

Stripping Varnish off Terracotta Kitchen Tiles and Resealing in Bristol

Terracotta tiles are always a popular choice for Kitchens but being made from clay they are porous and need to be sealed to prevent dirt from becoming ingrained in the tile. Once sealed though you need to remember Kitchens are high traffic areas, so you can expect the sealer to wear off quicker than it would elsewhere.

I mention this as a customer from Bristol asked me to do a survey on her Varnish Sealed Terracotta Kitchen Tiles where the seal had worn down and were now dull, and the grout had darkened. I surveyed the floor and completed a test clean on a section of the floor which came out well impressing the customer who was happy for me to proceed with cleaning and sealing the floor.

Terracotta Kitchen Floor Tiles in Bristol Before Cleaning Terracotta Kitchen Floor Tiles in Bristol Before Cleaning

Traditionally Terracotta tiled floors have been sealed with a number of products over the years including Wax, Linseed Oil and on this occasion Varnish however all these products have their disadvantages and don’t compare to modern sealers which are designed for the job.

Terracotta Kitchen Floor Tiles Bristol Before Cleaning

Cleaning a Dirty Terracotta Tiled Kitchen Floor

The first day was spent trying to get the Varnish off the floor which somebody had used on the floor as a sealer; Varnish is easily scratched by furniture, so I certainly wouldn’t recommend it. I worked out however that it could be scrubbed off once coated in a combination or Tile Doctor products Pro-Clean, Remove and Go and Nano-Tech HBU which would be left to soak in for a while and then softened with steam.

Mechanical assistance from a buffing machine fitted with a large black scrubbing pad helped reduce the amount of elbow grease that was required and once I was happy the tiles were clean the now soiled solution was rinsed off with water and extracted using a wet vacuum.

The next day and with the floor now clear I was able to see those areas that needed further re-treatment and also turn my attention to the grout which was cleaned using more cleaning solution worked in with a stiff narrow grout brush that gets into the grout lines. Once I was completely happy with the floor its was given a final rinse with water to remove any trace of cleaning products and then dried with a wet vacuum to remove as much moisture as possible.

Terracotta Kitchen Floor Tiles in Bristol After Cleaning

Sealing a Dirty Terracotta Tiled Kitchen Floor

It’s important that the tiles are dry before sealing so I left the floor to dry out for three days before returning to seal them. No Varnish this time of course, Tile Doctor has a range of sealers for every type of situation and what I find works best on Terracotta tiles is a single coat of Tile Doctor Colour Grow topped off with multiple coats of Tile Doctor Seal and Go.

Terracotta Kitchen Floor Tiles in Bristol During Cleaning
Tile Doctor Colour Grow is an impregnating sealer that penetrates into the pores of the clay protecting it from within whilst enhancing colour whilst Seal and Go completes the sealing process and adds a nice sheen to the look of the tile.

Terracotta Kitchen Floor Tiles in Bristol After Cleaning and Sealing Terracotta Kitchen Floor Tiles in Bristol After Cleaning and Sealing

As you can see from the final photographs the floor looked really good and the customer gave me top marks for feedback.

Terracotta Kitchen Floor Tiles in Bristol After Cleaning and Sealing
 

Professional Terracotta Tiled Kitchen Restoration in Gloucestershire

Stripping Varnish off Terracotta Kitchen Tiles and Resealing in Bristol Read More »

Limestone Tiles Sealed With Brown Wood Sealer after restoration in Tewksbury

Restoring Limestone Tiles Sealed With Brown Wood Sealer in Tewksbury

Slightly different story for you below; this time from the medieval town of Tewksbury which dates all the way back to the 8th century. A customer there had asked if there was anything that could be done to restore the appearance of their polished Limestone kitchen floor on which he had previously applied a wood sealer which had turned the tiles brown.

I inspected the floor and ran a test clean on a small section of tile which successfully removed the wood seal. This gave the customer the confidence to book me into to complete the job which I estimated would take three days to strip off the old sealer, deep clean and reseal with a more appropriate product.

Limestone Tiles Sealed With Brown Wood Sealer before restoration in Tewksbury
You probably can’t appreciate how bad the tiles looked from the photograph above but if you look at the indicated area under the kitchen units where the kick boards have been removed you can really see how the brown stain in the wood sealer has darkened the look of the tile.

Removing Old Sealers from Limestone Kitchen Floor

On the first day I prepared the area by removing the kick boards from the underneath the kitchen units so they wouldn’t get affected by the cleaning process and started wetting the floor with water. The water lubricates the burnishing process whereby coarse diamond encrusted pads are applied to the floor with a buffing machine. We started the process using a very coarse 100 grit milling pad to remove the wood sealer before moving onto the finer pads from 200 grit, 400 grit, 800 grit and finally 1500 grit pad building the finish of the floor as we progressed. The floor is rinsed with water between pads and the slurry is removed using a wet vacuum.

This burnishing process took up all of the first day so the next day I returned to focus on the edges I had missed and the grout lines, being a relatively small format tile for Limestone there was a lot of grout to cover. I tacked the grout lines with Remove and Go which is a powerful stripper and cleaning agent which is applied along the grout line and then scrubbed in with a narrow stiff brush before being rinsed away with water. The edges were treated with a set of small six inch milling pads fitted to a hand held buffing machine in a similar process as on the first day.

Sealing a Limestone Tiled Floor

On the third and final day the floor was spray burnished which a process is involving a very fine 3,000 grit floor burnishing pad and a little water spayed onto the floor during the application. This process really tightens up the pores in the stone and restores its appearance.

After making sure the floor was free of any lose grit I then proceeded to seal the Limestone with Tile Doctor Ultra Seal which is a natural look sealer that doesn’t alter the appearance of the stone but penetrates into the pores of the stone to protect it from within. I left it to dry for an hour then buffed the floor with a white buffing pad before apply a second coat. This was also left to dry for an hour before running the buffing pad over for a last time.

Limestone Tiles Sealed With Brown Wood Sealer After restoration in Tewksbury
It took a fair amount of work to get the floor looking back the way it was meant to be but I’m very pleased with the outcome and more importantly my customer was really happy.

Limestone Tiles Sealed With Brown Wood Sealer After restoration in Tewksbury
 

Professional Limestone Floor Polishing and Sealing in Gloucestershire

Restoring Limestone Tiles Sealed With Brown Wood Sealer in Tewksbury Read More »

Ceramic Tiled Floor Westmancoate after cleaning

Ceramic Tiles and Grout Lines Rejuvenated in a Westmancote Hallway

This customer who lives in the old picturesque village of Westmancote, Gloucestershire asked me to do a home survey on their ceramic kitchen tiles which had been laid around fifteen years prior. With the exception of general cleaning not much had work had been done to the tile and grout and now the tiles were looking dull and the grout had turned black.

Ceramic Tiled Floor Westmancoate before cleaning
As part of the survey I ran a test clean on part of the floor and the tile and grout came up really well which convinced the customer to give me the job and I was soon booked in to return to complete the floor and work my magic.

Ceramic Tiled Floor Westmancoate before cleaning Ceramic Tiled Floor Westmancoate Cleaning Grout Lines

Deep Cleaning Ceramic Tile and Grout

The first job was to give the floor a sweep to remove any grit and then I set about cleaning the grout lines. The grout had trapped a lot of dirt so I decided to start with the application of Tile Doctor Remove and Go which is a strong cleaner/stripper that is safe to use on all types of tile and grout. The Remove and Go was left to soak into the grout for about ten minutes before being scrubbed in with a stiff grout brush. This process released the dirt and the now soiled solution was rinsed away using water which was then extracted using a wet vacuum.

Next step was to turn my attention to the Ceramic tiles which needed a deep clean so this time I applied a medium dilution of Tile Doctor Pro-Clean, left to dwell for ten minutes then ran over the tiles with tan pad fitted to a rotary buffing machine. Once the floor was done I rinsed away the soiled cleaning solution with water and extracted with the wet vacuum.

Sealing Floor Grout

I find it’s always the grout that lets down the appearance of a Ceramic tiled floor which are usually fairly maintenance free, to guard against this I always recommend the grout is sealed. Given the condition of the grout in this case it was definitely a good idea as I’m sure it wouldn’t be long before it started to discolour again.

With this in mind I sped up the drying of the grout lines with a heat gun and once done I sealed the grout lines using Tile Doctor Ultra Seal applied carefully with a Pipette.

Ceramic Tiled Floor Westmancoate after cleaning Ceramic Tiled Floor Westmancoate after cleaning

The customer was pleased with the end result and left the following feedback via the Tile Doctor feedback system.

Very professional work. We were sold on it when he came to quote and did a small patch clean. Malcolm was able to come within a few days of confirming his price was acceptable and the job was done swiftly and to an excellent standard. We now have a new floor!

Professional Grout Cleaning and Sealing in Gloucestershire

Ceramic Tiles and Grout Lines Rejuvenated in a Westmancote Hallway Read More »

Travertine Kitchen Floor in Greet After Cleaning and Sealing

Restoring the Appearance of Travertine Kitchen Tiles in Greet

Details below of an unusual Travertine tiled kitchen floor in Greet, Gloucestershire where we were asked to restore the appearance of the tiles and leave a natural as opposed to shiny finish. Greet is a lovely little village at the edge of the Cotsworlds and famous for being a short walk to Winchcombe station on the Gloucestershire Warwickshire Railway which is run by volunteers and often has steam trains running on its line.

Travertine Kitchen Floor in Greet Before Cleaning Travertine Kitchen Floor in Greet Before Cleaning

Burnishing a Travertine Tiled Floor

Travertine responds well to burnishing which is an abrasive cleaning method as opposed to chemical. Basically, it involves the application of several different grades of diamond encrusted pad to the stone lubricated with a small amount of water. You run the pad over each tile and then give the floor a quick rinse before moving on to the next pad, I started with the first of the four burnishing pads which is a coarse 400 grit pad that designed to grind away the dirt and old sealer on the surface of the floor.

After applying the first pad, I moved my way through the medium 800 and fine 1500 grit pads to gradually restore the appearance of the Travertine. Normally I would of also applied the fourth pad in the series but if you recall the customer did not wanted a polished appearance so I stopped after the 1500 grit pad.

Travertine Kitchen Floor in Greet During Cleaning
The pads work well on tile but struggle to reach recessed grout so to clean that I applied a medium dilution of Tile Doctor Pro-Clean and scrubbed it into the grout lines manually using a stiff grout brush. Once I was happy with the appearance of the grout the soiled cleaning solution was rinsed away with water and extracted using a wet vacuum leaving the floor to dry off overnight.

Sealing a Travertine Tiled Floor

The next day I returned to finish the floor and first task was to run a Tan buffing pad over the floor to ensure the floor was clean and any residue from the diamond pad burnishing had been removed.

Travertine Kitchen Floor in Greet After Cleaning Before Sealing
Once I was happy with the tiles I proceeded to apply two coats of Tile Doctor Colour Grow which is an impregnating sealer that protects from within by occupying the pores in the stone so dirt can penetrate and lifts the natural colours in the stone in the process.
I should mention that normally only one coat of Colour Grow is usually required to seal Travertine however on this occasion the stone was quite porous.

Travertine Kitchen Floor in Greet After Cleaning and Sealing Travertine Kitchen Floor in Greet After Cleaning and Sealing

The colours in the Travertine were so much more vibrant after the job was completed and the customer was happy with the result, although personally I would have preferred to have applied the fourth pad to build up the shine however I delivered what the customer had asked for so I was happy with that.

Professional Travertine Floor Polishing and Sealing in Gloucestershire

Restoring the Appearance of Travertine Kitchen Tiles in Greet Read More »

African Slate Floor Before After Cleaning and Sealed in Mickleton

Dark African Slate Tiles Rejuvenated in Mickleton

African Slate has a striking realism to it and its natural mix of light and dark shades is difficult to compare to anything else. This example of an African Slate tiled floor was installed in the kitchen of a property in Mickleton, Gloucestershire, a town which is best known for its tradition of vegetable gardening.

African Slate Floor Before Cleaning in Mickleton
The floor was laid 15 years ago, but the owner had not maintained the sealer which would have protected the porous stone from dirt becoming ingrained. As a result, the floor was now in poor condition with the rich dark tones in the stone now dull, dirty and unremarkable. The owner had decided it was time to put it right so I was called in to make sure the tiles were restored to their original magnificence.

African Slate Floor Before Cleaning in Mickleton

Cleaning an African Slate Tiled Floor

My first job was to unclip the kickboards from the base of the kitchen units, and then also cover the units themselves with plastic to guard them against potential splashing from the cleaning process.

Next, to begin the process, I applied a solution of one part Tile Doctor Pro-Clean and three parts plain water. Pro Clean is a high alkaline cleaner which is so reliable when it comes to removing dirt that we use it on almost every job we do, from Slate and Quarry to Marble and Sandstone.

Once the product had been applied, I left it to soak into the stone for approximately fifteen minutes. Then, using my buffing machine fitted with a 17 inch black scrubbing pad, I scrubbed the solution into the stone to clean the floor, releasing the ingrained dirt and removing the stains in the process. All the subsequent cleaning slurry was vacuumed up with a wet vacuum and I rinsed the floor with plain water.

I repeated this process a couple of times to ensure the most thorough clean possible. Then once satisfied with the condition of the tiles, I turned my attention to the cleaning all the dirty grout lines, again using Pro-Clean. The main difference here was that I scrubbed the product in by hand using a special grout brush as opposed to using a buffing machine. The rinsing and vacuuming process was then carried out once again.

Sealing an African Slate Tiled Floor

Once the cleaning process had been completed, I covered the floor with dust sheets and left it to dry off overnight.

I returned to the property the next day to find the the floor dry and ready to be sealed. I proceeded to seal the tiles with four coats of Tile Doctor Seal and Go, leaving roughly 30 minutes between coats.

African Slate Floor After Cleaning and Sealing in Mickleton
Seal and Go is a robust sealer that works really well on floors like these and results in a durable low sheen finish that really emphasises the natural characteristics of the African Slate.

African Slate Floor After Cleaning and Sealing in Mickleton
The customer was absolutely delighted with the restored appearance of the floor. In fact, it reminded her of how it looked when it was first installed 15 years ago! A complete transformation in just two days.

Professional African Slate Tiled Floor Restoration in Gloucestershire

Dark African Slate Tiles Rejuvenated in Mickleton Read More »

Limestone Tiled Lounge Floor After Cleaning in Vale Gloucestershire

Burnishing and Sealing Works Wonders for Limestone Tiles in Yate

Limestone is known on the international market for its premium toughness, durability and aesthetic characteristics. This can make it difficult to maintain however, especially if the stone has been polished and lustre on the stone has started to wear down which is inevitable with use.

The traditional method of getting a the shine back on polished stone is called honing which is expensive however at Tile Doctor we have worked out a much more affordable process called burnishing which utilises different grades of diamond encrusted pads to clean and then bring up the polish.

I recently undertook the restoration of a large area of Limestone tiles in the kitchen and lounge of a property in Yate, Gloucestershire. The floor as a while had become dull and dirty – and was long overdue some professional attention.

Limestone Tiled Lounge Floor Before Cleaning in Vale Gloucestershire

Burnishing a Limestone Tiled Floor

Before starting I removed the kick boards from the underneath the kitchen units so they wouldn’t get affected by the cleaning process. Once prepped I started the burnishing process which is a chemical free process that uses a small amount of water for lubrication and a quick rinse between the use of each pad. I started with the first of the four burnishing pads which is a coarse 400 grit pad that designed to grind away the dirt and old sealer on the surface of the floor.

After applying the first pad, I moved my way through the medium 800 and fine 1500 grit pads to gradually build up the shine. As the floor became cleaner it became apparent the grout lines were not in particularly good condition as well so I opted to clean these using a stiff grout brush and Tile Doctor Remove and Go which is specially formulated to remove old sealers whilst tackling dirt and stains.

After completing the clean and giving the floor a final rinse I extracted as much moisture from the floor as possible using a wet vacuum and left the tiles to dry off overnight.

Sealing a Limestone Tiled Floor

Returning to the property next day, I tested to check tiles were dry and then proceeded to buff the tiles once over using the last of the four pads which is a 3,000 grit burnishing pad that finished off the polishing process.

Finally, I applied two coats of Tile Doctor Ultra Seal, which is an impregnating dealer designed to provide maximum stain production with a natural look finish. I buffed further in between each coat to ensure the best possible polish was achieved.

Limestone Tiled Lounge Floor After Cleaning in Vale Gloucestershire
This was a tricky floor to photograph due to the sunlight streaming through the windows on both days but hopefully you can appreciate the difference as much as the customer can.

Professional Limestone Floor Polishing and Sealing in Gloucestershire

Burnishing and Sealing Works Wonders for Limestone Tiles in Yate Read More »

Scroll to Top