Limestone Tile Cleaning and Polishing

Welcome to my Work History archive where you will find detailed examples of the cleaning and renovation of Limestone tiles carried out in Gloucester

Cleaning and Renovating Limestone tiles

Limestone is a sedimentary stone, as such it’s generally very porous and acid sensitive and can be damaged through the use of even mildly acidic soaps, shampoos and body washes. Because of this we do not recommend it for use in wet rooms, shower cubicles or near swimming pools.

Like any stone Limestone needs to be sealed to prevent dirt becoming ingrained in its pores and many varieties including Blue Lias, Blue Moleanos, Jerusalem and White Moleanos to name a few can be polished to a high shine using a series of burnishing pads.

We have found that Black Limestone has become very popular in gardens where it contrasts well against green planting and looks fantastic when wet. One issue we find however is it easily upset by the use of acidic patio cleaners that leave the stone looking dull and lifeless. If this has affected you then not to worry we do have a way of restoring the beauty of the stone back to its original condition.

Below you will find detailed examples of work we have carried out in the past, it should give you some idea of what’s involved and what can be achieved with the right techniques and products.


Black Limestone Patio Restoration Dursley

Ruined Black Limestone Patio Restored in Dursley

Earlier this year a client from my home town of Dursley phoned Tile Doctor in an emotional state having just had a Black Limestone patio laid and then immediately ruined when the tiler tried to clean it with brick acid. Limestone is a sedimentary rock composed primarily of calcium carbonate which can be dissolved in acid, so using acid on Limestone is never a good idea.

Black Limestone Patio Before Renovation Dursley Black Limestone Patio Before Renovation Dursley

I went along to survey the patio and could immediately see that the stone had been bleached white by the acid and looked terrible. Whilst there I completed a test clean to work out the best method for renovating the patio. Much to the relief of the owner the results were very encouraging and so she was happy to accept my quote and I was booked in to do the work.

Black Limestone Patio Before Renovation Dursley

I needed a couple of warm and dry days to do the work but fortunately the weather this summer was exceptional, so it wasn’t long before an opportunity arrived.

Cleaning a Limestone Tiled Patio Floor

I spent the first day burnishing the tiles with 200, 400 and 800-grit diamond pads using the rotary machine in sequence, these pads renovate the surface of the stone and remove the etching caused by the acid. Water was used to lubricate the process and the floor was rinsed with fresh water after each pad and the soil extracted with a wet vacuum.

Sealing a Limestone Tiled Patio Floor

The patio was left to dry off overnight and I returned the next day to finish the renovation checking first that the stone was dry with the use of a damp meter. The readings were good, so I went ahead and applied a single coat of Tile Doctor Stone Oil which puts the oil back in the stone.
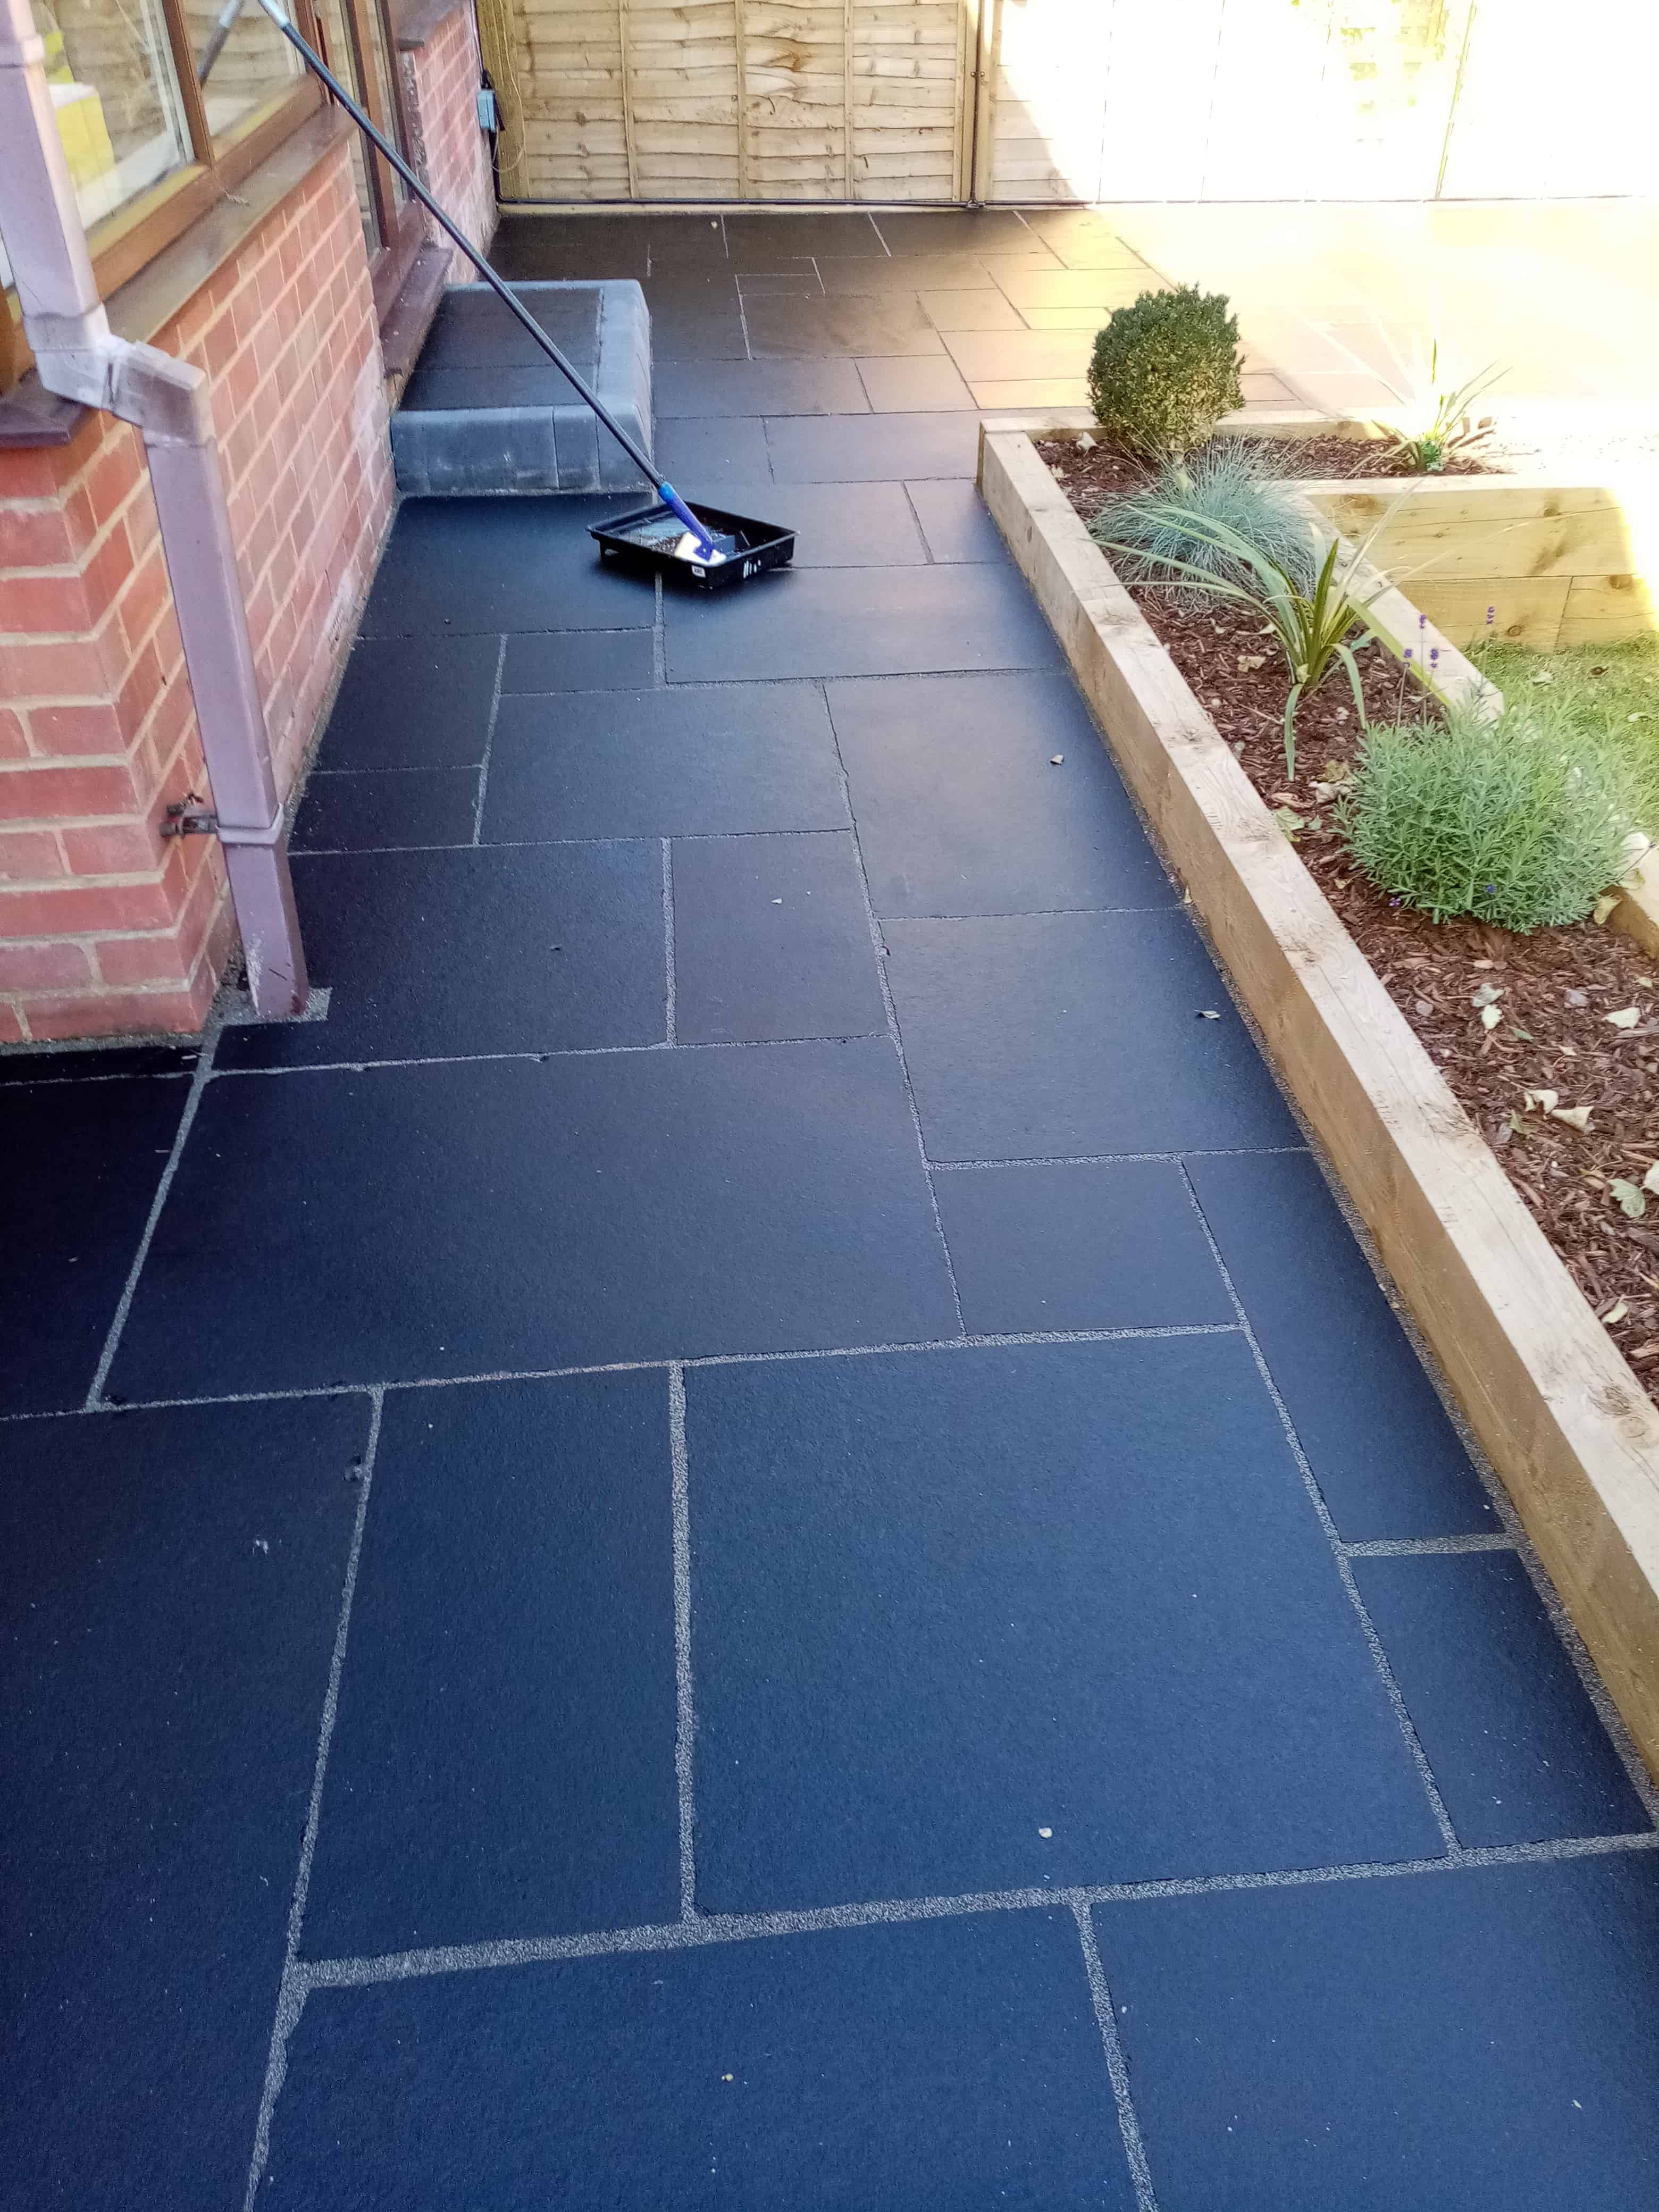
Black Limestone Patio During Sealing Dursley

The Stone Oil was left to dry for an hour and then this was followed up with two coats of Tile Doctor Colour Grow sealer to add protection. Tile Doctor Colour Grow is a colour intensifying impregnating sealer that allows the surface to breath and enhances the colour as well as providing durable protection. The patio will now be able to withstand the outside weather and the stone will be protected from the elements. For maintenance we recommend the patio to be cleaned and resealed annually which will keep it in great condition and extend its’ life.

Black Limestone Patio After Renovation Dursley

The results were amazing, you would not have thought it was the same patio, needless to say, my client very pleased by the transformation. Apparently, she has now managed to squeeze in a few late summer barbeques with friends to show off her lovely new patio.

Black Limestone Patio After Renovation Dursley


Professional Restoration of a Limestone Tiled Patio in Gloucestershire

Ruined Black Limestone Patio Restored in Dursley Read More »

Black Limestone Patio Before After Renovation Cheltenham

Refinishing a Black Limestone Patio After Installation in Cheltenham

This client called Tile Doctor to see if anything could be done about the colour of their limestone patio which was laid about 6 months prior at their house in Cheltenham. It and had always looked grey rather than the black they had expected and with summer on the way felt it was time to get it resolved.

Black Limestone Patio Before Renovation Cheltenham

I went over to survey the Limestone paving and could see straight away that whoever had installed it had not cleaned off the cement and grout residue afterwards. Add on top of that the green algae and dirt build-up you get over winter and the Patio was now looking very sorry for itself.

I conducted a test clean on a small area to work out the best method for restoring the appearance of the stone. The Limestone responded well to the test and it gave the customer the results he was looking for. Happy with the potential result and my quotation a date was booked for the work, although this was weather dependent. The job would take 3 days to complete.

Black Limestone Patio Before Renovation Cheltenham Black Limestone Patio Before Renovation Cheltenham

Removing Cement and Grout from a Black Limestone Patio

We were quite fortunate with the weather and managed to find a few days without rain. Arriving on day one, the client had moved all the patio furniture out of the way, so we were able to get to work immediately starting with the application of a coarse 200 grit diamond pad fitted to a large buffing machine. The pad is applied to each paving stone in turn and lubricated with plenty of water. This action slightly mills the Limestone to remove all the old cement and grout that had been left of the surface. After rinsing with water and extracting the soil the process was repeated using a 400 and 800-grit burnishing pad to hone the stone and bring up its appearance. The area was quite large, so this took most of the first day.

Returning the following morning, we moved onto cleaning the grout lines using a strong dilution of Tile Doctor Pro-Clean. Then the whole patio was rinsed with water and scrubbed using a wet vacuum to extract all the soil generated. The patio was left overnight to dry out, the weather remained good, so we were able to come back the next day to seal it and complete the job.

Sealing a Black Limestone Tiled Patio

To seal the Limestone and restore colour I selected to use Tile Doctor Stone Oil, this is an easy to apply impregnating sealer, ideal for low porosity stone such as Limestone. Stone Oil is designed to enhance the colour and texture of stone, it also improves mechanical strength once it is cured.

One coat was applied to get the colour back in the stone, giving it the nice rich black it should have been. The stone was left to dry for two hours and then followed up with a coat of Tile Doctor Ultra-Seal to further seal the stone. Ultra-Seal is a no-sheen, natural-look, penetrating sealer formulated to provide maximum stain protection. It is also an excellent grout sealer.

Black Limestone Patio After Renovation Cheltenham

As you can see from the pictures the results were fantastic and the customer was very happy that the patio now looked how they had expected it to when it was installed. The sealant should give it adequate protection from the elements but would need to be reapplied in future years. They were looking forward to making the most of the sunny weather and getting the barbeque out to make use of their lovely newly restored patio.

Black Limestone Patio After Renovation Cheltenham


Professional Restoration of a Black Limestone Tiled Patio in Gloucestershire

Refinishing a Black Limestone Patio After Installation in Cheltenham Read More »

Polished Limestone Tiled Kitchen Floor Before and After Polishing Cheltenham

Restoring the Appearance of a Polished Limestone Tiled Floor in Cheltenham

The photographs below are of a Polished limestone floor that had been installed in the Kitchen of a house in Cheltenham approximately eight years prior. The polish and sealer had worn off over that time allowing dirt to become ingrained into the pores of the stone making it difficult to clean.

This is a common problem with all types of porous stone and tile which need to be sealed to maintain their appearance. Sealers do wear down over time with use however and need to be maintained, this is why Tile Doctor have created a maintenance program whereby we pop by every 12 months to give the floor a light clean and top-up the sealer, it only takes a few hours, but it keeps your sealer in good condition.

Polished Limestone Kitchen Floor Before Cleaning in Cheltenham Polished Limestone Kitchen Floor Before Cleaning in Cheltenham

Cheltenham by the way is a lovely town situated on the edge of the Cotswolds which is an area of Outstanding Natural Beauty. It has a racecourse and is well known for the mineral springs which were discovered here in 1716.

Burnishing a Dull and Dirty Limestone Tiled Floor

My first job was to protect the wooden kitchen units from any splashes by covering them some cotton sheets. Next, I set about restoring the Limestone’s appearance using a set of Burnishing Pads which is a form of polishing which involves the sequential application of four diamond encrusted pads of different grit levels.

The first pad applied is a Coarse 400 grit pad which is applied to the floor with a buffing machine and lubricated with water. This process grinds away the top layer of dirt and staining from the stone, along with any old sealer, the floor is then rinsed to remove the soil that is generated. I then move through the system, applying the Medium and then Fine pads using less and less water as you go but rinsing in-between and extracting the water with a wet-vac machine.

Once I was happy with the stone I scrubbed the grout lines to remove any soiling that the pads had failed to pick up. The floor was then given a final rinse and the wet vacuum used to extract as much moisture as possible. The floor was then left to dry out completely overnight.

Sealing a Limestone Tiled Floor

The next day I gave the floor a polish with the Very Fine 3,000 grit diamond burnishing pad, this is applied using a technique we call a “spray burnish” due to the fact that very little water is used during its application.

The next step was to seal the stone using for which I used Tile Doctor Colour Grow which is an impregnating sealer that protects the stone from within by occupying its pores. Colour Grow also has the added benefit of intensifying the natural colours in the stone. The floor was then left to dry for an hour before I gave it one final dry polish using the Very Fine burnishing pad.

Polished Limestone Kitchen Floor After Cleaning in Cheltenham
My customer was very happy with the final result and made the comment that they thought the floor looked brand new.

Polished Limestone Kitchen Floor After Cleaning in Cheltenham
 

Renovating a Polished Limestone Tiled Floor in Gloucestershire

Restoring the Appearance of a Polished Limestone Tiled Floor in Cheltenham Read More »

Restoring Limestone Tiles Sealed With Brown Wood Sealer in Tewksbury

Restoring Limestone Tiles Sealed With Brown Wood Sealer in Tewksbury

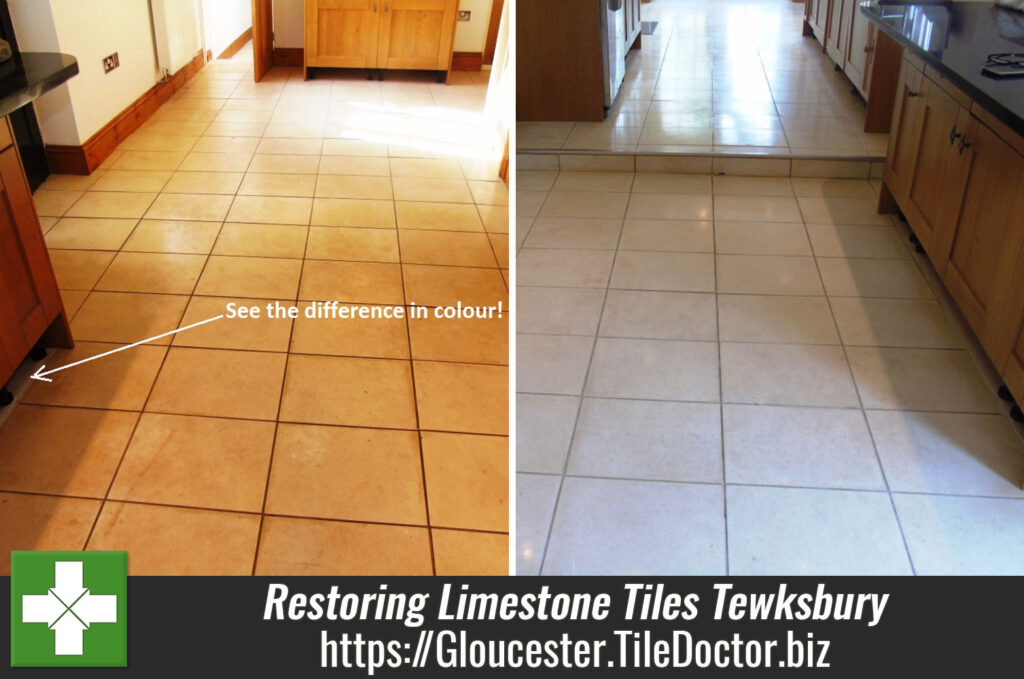
Slightly different story for you below; this time from the medieval town of Tewksbury which dates all the way back to the 8th century. A customer there had asked if there was anything that could be done to restore the appearance of their polished Limestone kitchen floor on which he had previously applied a wood sealer which had turned the tiles brown.

I inspected the floor and ran a test clean on a small section of tile which successfully removed the wood seal. This gave the customer the confidence to book me into to complete the job which I estimated would take three days to strip off the old sealer, deep clean and reseal with a more appropriate product.

Limestone Tiles Sealed With Brown Wood Sealer before restoration in Tewksbury
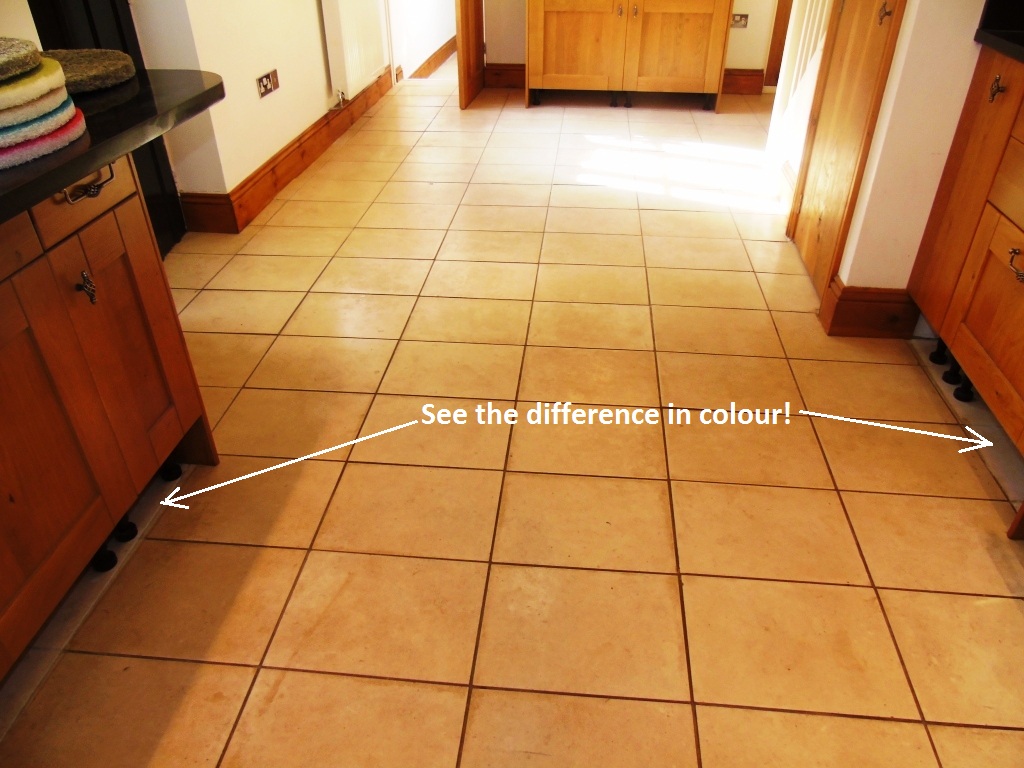
You probably can’t appreciate how bad the tiles looked from the photograph above but if you look at the indicated area under the kitchen units where the kick boards have been removed you can really see how the brown stain in the wood sealer has darkened the look of the tile.

Removing Old Sealers from Limestone Kitchen Floor

On the first day I prepared the area by removing the kick boards from the underneath the kitchen units so they wouldn’t get affected by the cleaning process and started wetting the floor with water. The water lubricates the burnishing process whereby coarse diamond encrusted pads are applied to the floor with a buffing machine. We started the process using a very coarse 100 grit milling pad to remove the wood sealer before moving onto the finer pads from 200 grit, 400 grit, 800 grit and finally 1500 grit pad building the finish of the floor as we progressed. The floor is rinsed with water between pads and the slurry is removed using a wet vacuum.

This burnishing process took up all of the first day so the next day I returned to focus on the edges I had missed and the grout lines, being a relatively small format tile for Limestone there was a lot of grout to cover. I tacked the grout lines with Remove and Go which is a powerful stripper and cleaning agent which is applied along the grout line and then scrubbed in with a narrow stiff brush before being rinsed away with water. The edges were treated with a set of small six inch milling pads fitted to a hand held buffing machine in a similar process as on the first day.

Sealing a Limestone Tiled Floor

On the third and final day the floor was spray burnished which a process is involving a very fine 3,000 grit floor burnishing pad and a little water spayed onto the floor during the application. This process really tightens up the pores in the stone and restores its appearance.

After making sure the floor was free of any lose grit I then proceeded to seal the Limestone with Tile Doctor Ultra Seal which is a natural look sealer that doesn’t alter the appearance of the stone but penetrates into the pores of the stone to protect it from within. I left it to dry for an hour then buffed the floor with a white buffing pad before apply a second coat. This was also left to dry for an hour before running the buffing pad over for a last time.

Limestone Tiles Sealed With Brown Wood Sealer After restoration in Tewksbury
It took a fair amount of work to get the floor looking back the way it was meant to be but I’m very pleased with the outcome and more importantly my customer was really happy.

Limestone Tiles Sealed With Brown Wood Sealer After restoration in Tewksbury
 

Professional Limestone Floor Polishing and Sealing in Gloucestershire

Restoring Limestone Tiles Sealed With Brown Wood Sealer in Tewksbury Read More »

Restoring the Appearance of a Polished Limestone Tiled Floor in Cirencester

Restoring the Appearance of a Polished Limestone Tiled Floor in Cirencester

This customer was looking to rent out his property in the East Gloucestershire town of Cirencester, the largest in the Cotswold District. However, he found that many prospective tenants were put off by the condition of the Limestone floor tiles on the ground floor.

Limestone Bathroom Floor Before Cleaning Cirencester
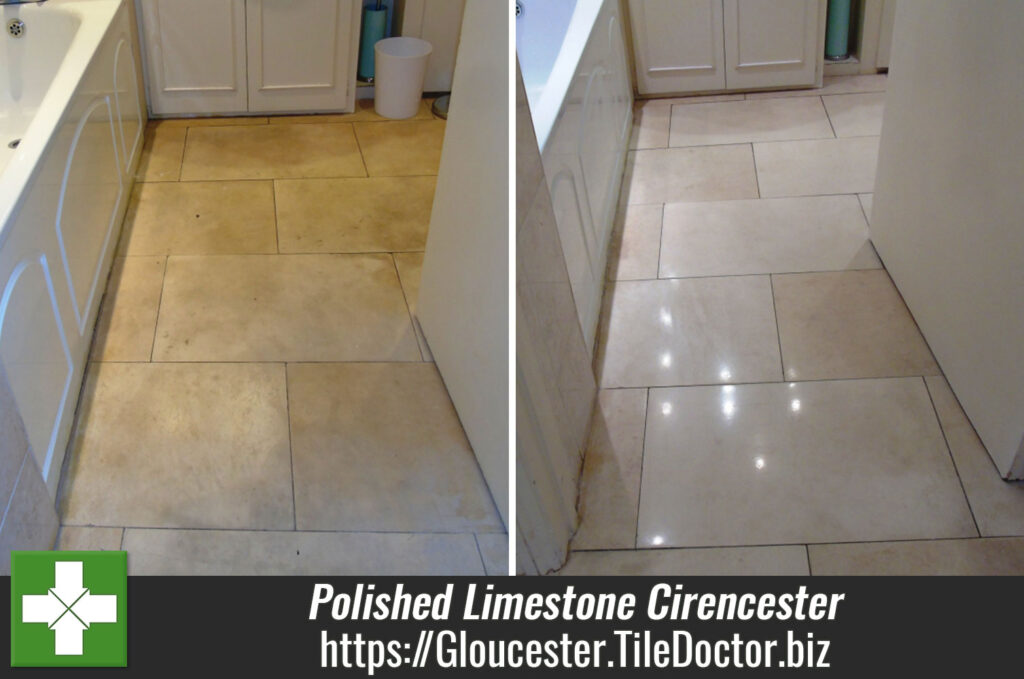
Over the years, the sealer had worn away and that had allowed for dirt and stains to become ingrained in the pores of the stone, leaving the Limestone tiles looking very dull, unclean and generally undesirable. To boost his chance of finding a tenant for the property, the customer asked me to come in to restore the Limestone tiles to their best possible condition.

Limestone Kitchen Floor Before Cleaning Cirencester
I arrived at the property and conducted a survey to assess the situation. The customer – not wanting to waste any more time – asked if I could complete the restoration straight away, fortunately I was able to shuffle a few things around and was able to make a start two days later.

Limestone Floor Before Cleaning Cirencester

Burnishing a Dull and Dirty Limestone Tiled Floor

With Limestone, as well as other high-end stone like Marble and Travertine, we find that the best method for restoration is burnishing. This is a form of polishing which involves the sequential application of diamond encrusted pads of different grit levels.

We work with a system of four pads fitted to a buffing machine. The first is a Coarse pad, which grinds away the top layer of dirt and staining from the stone, along with any old sealer. I then moved through the system, applying each in turn the Medium, Fine, and Very Fine burnishing pads to gradually refine the polish on the floor. A small amount of water was used as lubricant between each pad, and I hoovered up any resulting slurry with a wet-vac machine.

Having finished polishing the stone, I paid attention to cleaning the grout lines, applying Tile Doctor Remove and Go, which draws out any ingrained stains and heavy grease build-up, and scrubbing it in with a specialised grout brush. The floor was then left to dry out completely overnight.

Sealing a Limestone Tiled Floor

Upon returning to the property the next day, I checked the floor was completely dry and quickly vacuumed up any leftover debris from the previous day’s work. Next, I gave the floor another polish with the Very Fine 3000 grit diamond burnishing pad, vacuumed it again, and it was then ready to be sealed.

Limestone Floor Sealing Cirencester
To do this I used Tile Doctor Colour Grow, which is an impregnating sealer that not only acts to protect the stone, but also intensify its natural colours. The floor was then left to dry for an hour, before I subsequently gave it one final dry polish using the Very Fine burnishing pa fitted to the buffing machine. After vacuuming up any debris, I applied a second coat of Colour Grow, left it to dry, and finally buffed it with a soft white pad.

Limestone Kitchen Floor After Polishing Cirencester
The customer was really pleased with the results, having never expected for the restoration to turn out so well. Undoubtedly there will a queue of prospective tenants hoping to see the property now that the Limestone tiled floor looks so great!

Limestone Bathroom Floor After Polishing Cirencester
 

Professional Tile Burnishing, Cleaning and Sealing for a Dirty and Stained Limestone Tiled Floor Restoration in Cirencester

Restoring the Appearance of a Polished Limestone Tiled Floor in Cirencester Read More »
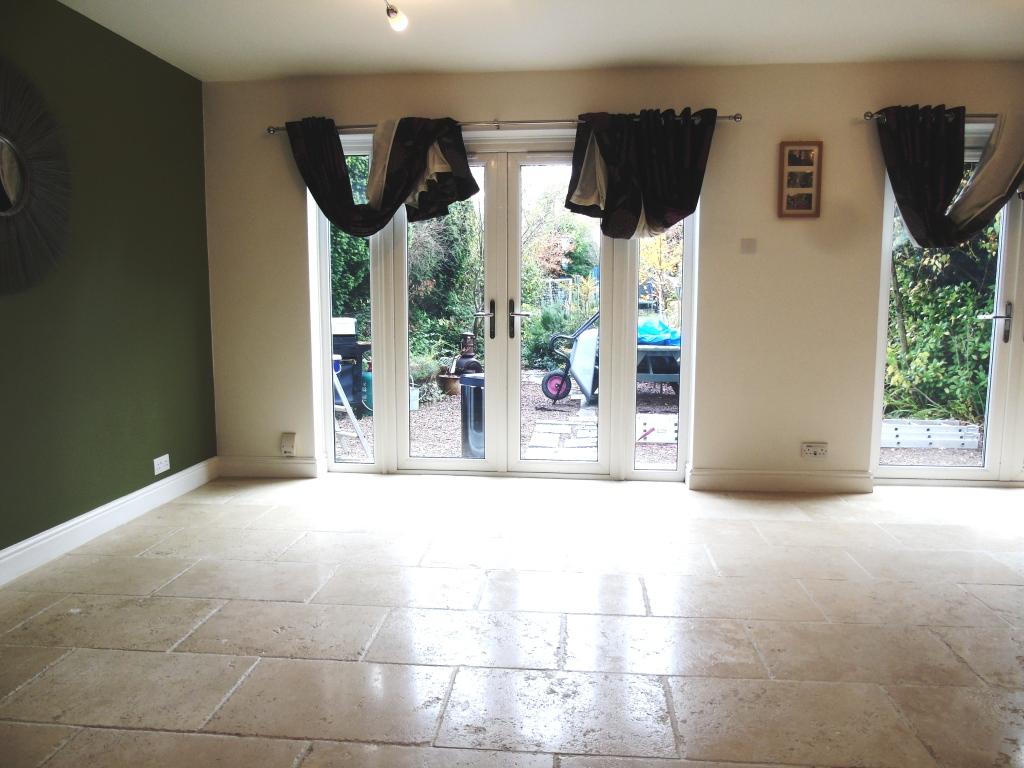
Burnishing and Sealing Works Wonders for Limestone Tiles in Yate

Burnishing and Sealing Works Wonders for Limestone Tiles in Yate

Limestone is known on the international market for its premium toughness, durability and aesthetic characteristics. This can make it difficult to maintain however, especially if the stone has been polished and lustre on the stone has started to wear down which is inevitable with use.

The traditional method of getting a the shine back on polished stone is called honing which is expensive however at Tile Doctor we have worked out a much more affordable process called burnishing which utilises different grades of diamond encrusted pads to clean and then bring up the polish.

I recently undertook the restoration of a large area of Limestone tiles in the kitchen and lounge of a property in Yate, Gloucestershire. The floor as a while had become dull and dirty – and was long overdue some professional attention.

Limestone Tiled Lounge Floor Before Cleaning in Vale Gloucestershire

Burnishing a Limestone Tiled Floor

Before starting I removed the kick boards from the underneath the kitchen units so they wouldn’t get affected by the cleaning process. Once prepped I started the burnishing process which is a chemical free process that uses a small amount of water for lubrication and a quick rinse between the use of each pad. I started with the first of the four burnishing pads which is a coarse 400 grit pad that designed to grind away the dirt and old sealer on the surface of the floor.

After applying the first pad, I moved my way through the medium 800 and fine 1500 grit pads to gradually build up the shine. As the floor became cleaner it became apparent the grout lines were not in particularly good condition as well so I opted to clean these using a stiff grout brush and Tile Doctor Remove and Go which is specially formulated to remove old sealers whilst tackling dirt and stains.

After completing the clean and giving the floor a final rinse I extracted as much moisture from the floor as possible using a wet vacuum and left the tiles to dry off overnight.

Sealing a Limestone Tiled Floor

Returning to the property next day, I tested to check tiles were dry and then proceeded to buff the tiles once over using the last of the four pads which is a 3,000 grit burnishing pad that finished off the polishing process.

Finally, I applied two coats of Tile Doctor Ultra Seal, which is an impregnating dealer designed to provide maximum stain production with a natural look finish. I buffed further in between each coat to ensure the best possible polish was achieved.

Limestone Tiled Lounge Floor After Cleaning in Vale Gloucestershire
This was a tricky floor to photograph due to the sunlight streaming through the windows on both days but hopefully you can appreciate the difference as much as the customer can.

Professional Limestone Floor Polishing and Sealing in Gloucestershire

Burnishing and Sealing Works Wonders for Limestone Tiles in Yate Read More »

=================================

Gloucester Tile Doctor

================================= Read More »

Scroll to Top